Upstash for Redis and Performance API: Cache where it Counts
In this article on Upstash for Redis and the Performance API we see how you can best use Upstash for Redis in a Deno app. Upstash for Redis is a serverless database ideal for server-side caching. A web app I was working on was scoring poorly on Initial Server Response Time. Lighthouse was reporting 500 ms. By adding an Upstash cache I took this down to below 150 ms and passed the audit. The difficult part was not adding the cache. As it happens, working out where to use the cache was critical. Only by measuring performance was I able to identify the bottleneck to boost performance with minimal work. We take a closer look at performance measurement in this article.
My project was a Deno Fresh web app. Deno has instant builds and deploys. This makes it a dream environment to work in for optimization. The feedback loop is short. You can code up an optimization locally, push it to the server and be able to test the remote site instantly.
Stack
Here I will talk about improving the performance using a skeleton app. It uses the following tooling:
upstash_redis: a Deno module for working with Upstash for Redis- Deno Fresh: a new, production-ready Framework for building server-side rendered (SSR) apps in Deno
- serverless logging: we use the console here, but for your deployed app, to access live measurements you will need a service like Logtail
Setup
A key difference between Node and Deno is how you access third-party modules in your code. Deno works with URLs and import maps instead of a package.json file. The full URL for upstash_redis, for example, is https://deno.land/x/upstash_redis@v1.20.0. To get started create a new Deno Fresh app.
deno run -A -r https://fresh.deno.dev upstash-redis-deno-perfYou can set up Deno itself on your system with a few Terminal commands, if you are trying it for the first time.
Now you can add Upstash to import_map.json in the project root directory:
{
  "imports": {
    "@/": "./",
    "$fresh/": "https://deno.land/x/fresh@1.1.2/",
    // ...TRUNCATED
    "$std/": "https://deno.land/std@0.177.0/",
    "upstash/": "https://deno.land/x/upstash_redis@v1.20.0/"
  }
}@/defines an import alias for convenience. This lets you importcomponents(in project root directory) using@/componentsno matter which folder your source file is in.$std/is our alias for the Deno Standard Library which has a utility function for reading.envenvironment variable files.upstash/lets us access the Upstash for Redis library from any TypeScript or JavaScript source file in the project.
Upstash for Redis and the Performance API: Skeleton App
The skeleton app will pull in:
- page views in the last 28 days using web analytics from Tinybird (serverless Clickhouse)
- page likes using Webmentions
These data are sourced using fetch requests, making our server tasks fairly representative of a real-world business app. The likes and views variables hold responses from these two APIs which we display in the frontend.

The server handler code for that page looks something like this:
export const handler: Handlers<Data> = {
  async GET(request, context) {
    const { url } = request;
    const { pathname } = new URL(url);

    const likes = await getWebmentionLikes(pathname);
    const views = await getTinybirdViews({ days: 28 });

    return context.render({ likes, views });
  },
};
We extract the pathname from the incoming request object, then use the pathname in the data helper functions and finally, return the remotely sourced values.
For efficiency, the calls to the helper functions can be restructured:
const [likes, views] = await Promise.all([
  getWebmentionLikes(pathname),
  getTinybirdViews({ days: 28 }),
]);
JavaScript Performance Web API
Performance measurement should typically be the first step in optimization. The rate limiting step is not always the one you expect it to be. Without measuring, you can easily end up spending time and resources on what turns out to be a suboptimal solution. The Performance API can help no end here. In this section we see how we can use it to determine where it makes most sense to use Upstash for Redis in the app.
window.performance gives you access to the Performance Web API from the client browser. Deno supports using Web APIs on the server and so performance is globally available in your Deno server-side code. Here are two performance methods you will want to use:
performance.mark('your-mark-name'): creates aPerformanceMarkobject, which represents a point in time. The name parameter is used when you create a measure with the mark.performance.measure('your description', startMarkName, finishMarkName): creates aPerformanceMeasureobject. This associates the start and finish time marks with a label, useful for logging and calculating how long the event took to run.
timeEvent: Performance Helper Function
Now we know the basics, lets create a timeEvent function. It will take an array of PerformanceMeasure objects and a function we want to time as inputs. timeEvent will create a start mark, invoke the passed in function, then immediately create a finish mark. Finally, it will mutate the array of PerformanceMeasure objects it received as input, adding the new one. Here is the code from utils/performance.ts:
export async function timeEvent<EventReturnType>(
  eventFunction: () => Promise<EventReturnType>,
  {
    description,
    performanceMeasures,
  }: { description: string; performanceMeasures: PerformanceMeasure[] }
): Promise<EventReturnType> {
  // prepare
  const startName = `${description}-started`;
  const finishName = `${description}-finished`;

  // time
  performance.mark(startName);
  const result = await eventFunction();
  performance.mark(finishName);

  // record
  performanceMeasures.push(
    performance.measure(description, startName, finishName)
  );

  return result;
}
The function is generic, though for the skeleton app, EventReturnType will always be a number.
Updating Server Code with Measurements
We can use the new timeEvent function in the handler, then start running the comparison. Here is the updated server handler code:
import type { Handlers, PageProps } from "$fresh/server.ts";
import "$std/dotenv/load.ts"; /* included for visibility here, typically you
 can import once for project in `dev.ts` */
import { timeEvent } from "@/utils/performance.ts";

// ...TRUNCATED

export const handler: Handlers<Data> = {
  async GET(request, context) {
    // ...TRUNCATED

    const performanceMeasures: PerformanceMeasure[] = [];

    const [likes, views] = await Promise.all([
      timeEvent<number>(() => getWebmentionLikes(pathname), {
        description: "web-mention-likes",
        performanceMeasures,
      }),
      timeEvent<number>(() => getTinybirdViews({ days: 28 }), {
        description: "analytics-views",
        performanceMeasures,
      }),
    ]);

    // Replace with a serverless logging service for production
    console.log({ performanceMeasures });

    return context.render({ likes, views });
  },
};
The timeEvent function returns the result of the function which we pass into it. This property lets us just wrap the two data helper functions we had previously in timeEvent calls. We are running locally here. For a production app, you need to run measurements on your live site, since backbone connections on your server will perform differently to local ones. When running on the server use a logging service like Logtail to record the measures.

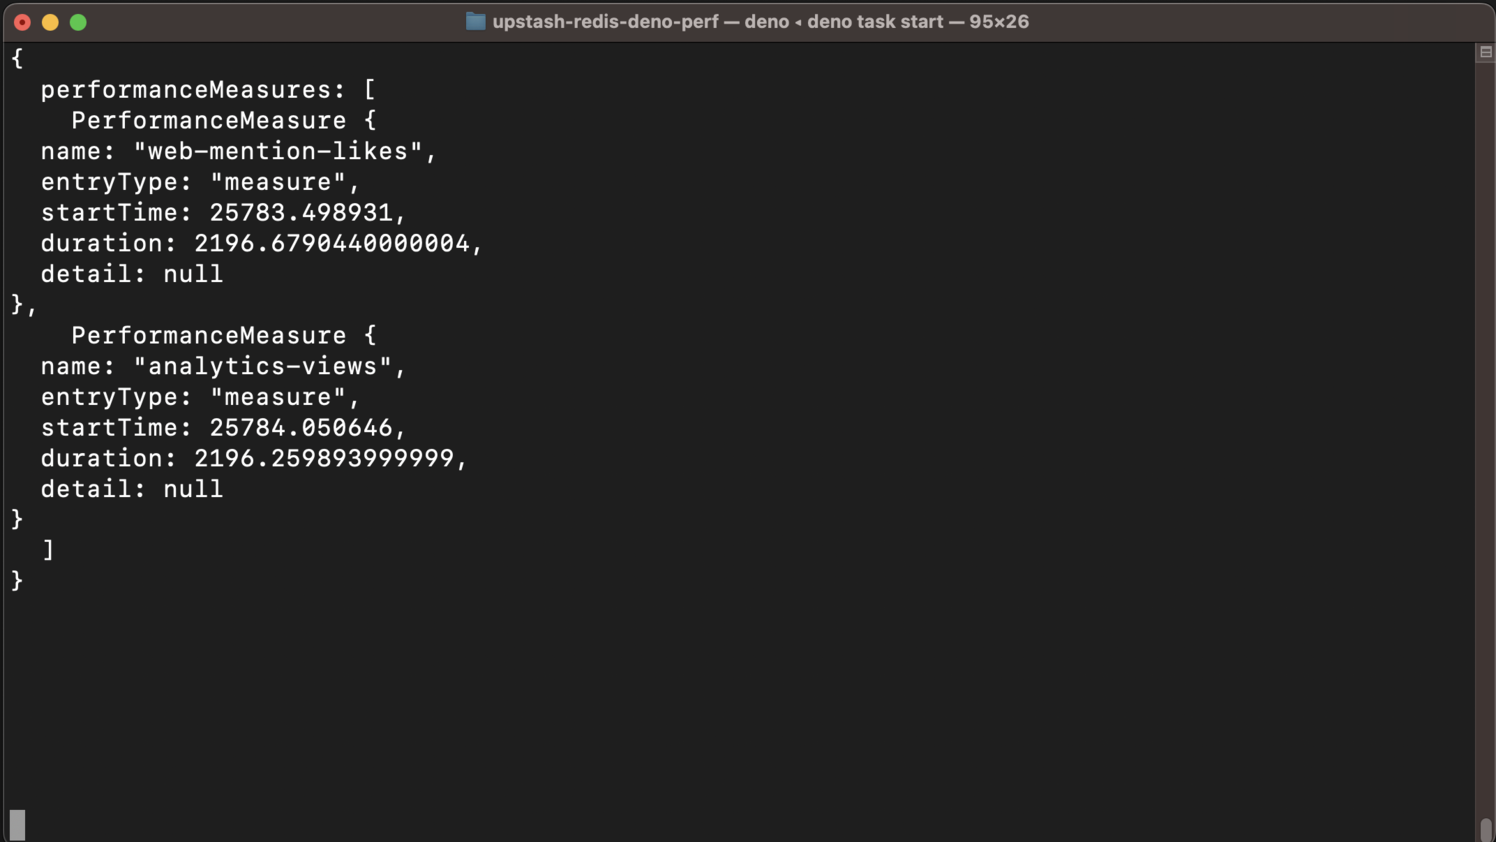
In the capture of the console log, you can see the PerformanceMeasure object provides the following measure values (which we mentioned earlier):
- name
- start time
- duration (in milliseconds)
Ideally, we need both data values (likes and views ) to render the app. Here they took around the same time as each other (2 seconds). If one function had run much slower than the other, we would add Upstash for Redis caching for the slowest value. Instead, here we will add it to both. Note, in production, we would want at least a few hundred data points. We can then use an aggregate measure like a mean or P90 for comparison.
Adding Upstash for Redis to the Analytics Helper Code
Let’s see the code for adding Upstash for Redis to the analytics helper function. The Webmentions helper function is similar and you can see it in full in the GitHub repo (link below).
import { Redis } from "upstash/mod.ts";

const UPSTASH_REDIS_REST_TOKEN = Deno.env.get("UPSTASH_REDIS_REST_TOKEN");
if (typeof UPSTASH_REDIS_REST_TOKEN === "undefined") {
  console.error("env `UPSTASH_REDIS_REST_TOKEN` must be set");
}
const UPSTASH_REDIS_REST_URL = Deno.env.get("UPSTASH_REDIS_REST_URL");
if (typeof UPSTASH_REDIS_REST_URL === "undefined") {
  console.error("env `UPSTASH_REDIS_REST_URL` must be set");
}

const redis = new Redis({
  token: UPSTASH_REDIS_REST_TOKEN,
  url: UPSTASH_REDIS_REST_URL,
});
First we have to initialize an Upstash for Redis object. You need the UPSTASH_REDIS_REST_TOKEN and UPSTASH_REDIS_REST_URL values from the Upstash console. It is quick to set up an Upstash account if you do not yet have one. Add both values (UPSTASH_REDIS_REST_TOKEN and UPSTASH_REDIS_REST_URL) to a .env file in the project root directory.
Notice in the first line, above, we use the upstash key from the import map which we set up earlier. This is more convenient than adding the full import URL in each TypeScript file. When the next release of upstash_redis becomes available you will only have to update the version number in one place.
Here is the getTinybirdViews function:
export async function getTinybirdViews({
  days,
}: {
  days: number;
}): Promise<number> {
  try {
    // ...TRUNCATED

    const cachedCount = (await redis.get("view-count")) as number | null;

    if (cachedCount != null) {
      return cachedCount;
    }

    // ...TRUNCATED
    const response = await fetch(
      `https://api.tinybird.co/v0/pipes/${TINYBIRD_PIPE_NAME}.json?${params.toString()}`,
      {
        headers: {
          Authorization: `Bearer ${TINYBIRD_TOKEN}`,
        },
      }
    );

    const {
      data: [{ count_sessions: count = -1 }],
    } = await response.json();

    if (typeof count === "number" && count > 0) {
      const CACHE_TTL_SECONDS = 14_400;
      await redis.set("view-count", count);
      await redis.expire("view-count", CACHE_TTL_SECONDS);
    }

    return count;
  } catch (error: unknown) {
    // ...TRUNCATED
  }
}
Here we:
- Check if there is already a Upstash for Redis cached value for
view-countwith a call toredis.get('view-count'). - Return the cached value if there is one, otherwise get a fresh value from Tinybird.
- Store and set an expiry for the fresh value in the Upstash for Redis cache by calling
redis.set('view-count', value)thenredis.expire(TTL). This sets the value with a time to live (TTL) value after which the data is considered stale. We setTTLto four hours here. For calls togetTinybirdViewsafter that period, we would hit Tinybird for a fresh value.

Refreshing the page (a couple of times) with Upstash for Redis integrated into both data queries we see things speed up. Here we dropped from just over 2 seconds to around 0.29 seconds. Do not read too much into the numbers here as we are running locally and also we do not have many data points. Try out the service on your own apps to see what kind of gains you can achieve.
Upstash for Redis and the Performance API: Wrapping Up
Here we saw how you can use the JavaScript performance API to help guide your decisions on where to focus your optimization efforts. Beyond that we saw how you can implement Upstash for Redis in Deno Fresh. Finally we discovered that Deno supports Web APIs server side, flattening the learning curve. The other huge benefit of Deno for optimization is instant deploys, giving you a short feedback loop and letting you move quicker when fine-tuning performance.
I hope found you reading about Upstash for Redis and the Performance API valuable. If you are new to Deno or Deno Fresh, take a look at some of the content I have created on getting started with Deno. You can open the full code for the app on GitHub.
