Build a Serverless Slackbot with Vercel and Upstash Redis
Slackbots are awesome tools if you use Slack and want to automate some tasks or ease your workflow. However, managing your own server might be a bit of an overhead. That is why, we created this tutorial, enabling for serverless deployment of slackbots.
What We Are Building
We are building a Note Taker slackbot. It will enable the users to:
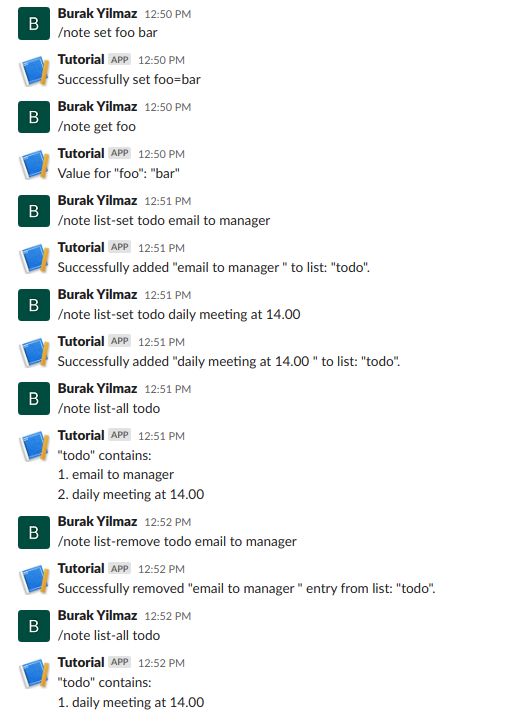
- Set key-value pairs.
- Create lists with adding to or removing/fetching from features.
Also:
- When mentioned, it mentions the user back in a general channel.
- Posts to the general channel once some new channel is created.


An example use case could be setting some index values for individual tasks or creating To-Do lists or task distribution for different team members, etc.
Getting Started
Some Conventions
- Currently, Vercel supports node v12 and v14. Before starting development, it may be a good idea to switch your node version to 14, especially for testing and local development.
- Since our files will act as api endpoints, all the files mentioned below should be in a directory called
api. - For deployment in Vercel, there is a naming convention for files:
- File names starting with
_will not be converted to endpoints.
I.E.
challenge.jswill result in an endpoint /api/challenge. If you don't want that, create the file as_challenge.js
Prepare the Database
We can create our Redis database on Upstash Console. Copy/paste the UPSTASH_REDIS_REST_URL and UPSTASH_REDIS_REST_TOKEN to the .env file:
UPSTASH_REDIS_REST_URL=<YOUR_REST_URL>
UPSTASH_REDIS_REST_TOKEN=<YOUR_REST_TOKEN>
Starting Development
First of all, npm install vercel axios crypto to install dependencies and Vercel CLI.
Create helper files:
These will help us customize and ease the management of our slackbot.
const axios = require("axios");
import { token } from "./_constants";

// Tokenizes the string so that commands can be extracted.
export function tokenizeString(string) {
  const array = string.split(" ").filter((element) => {
    return element !== "";
  });
  console.log("Tokenized version:", array);
  return array;
}

// Posts to a channel with given name with given text/payload.
export async function postToChannel(channel, res, payload) {
  console.log("channel:", channel);
  var channelId = await channelNameToId(channel);

  console.log("ID:", channelId);

  const message = {
    channel: channelId,
    text: payload,
  };

  axios({
    method: "post",
    url: "https://slack.com/api/chat.postMessage",
    headers: {
      "Content-Type": "application/json; charset=utf-8",
      Authorization: `Bearer ${token}`,
    },
    data: message,
  })
    .then((response) => {
      console.log("data from axios:", response.data);
      res.json({ ok: true });
    })
    .catch((err) => {
      console.log("axios Error:", err);
      res.send({
        response_type: "ephemeral",
        text: `${err.response.data.error}`,
      });
    });
}

// Converts the given channel name to channel id since post works with ids.
async function channelNameToId(channelName) {
  var generalId;
  var id;
  await axios({
    method: "post",
    url: "https://slack.com/api/conversations.list",
    headers: {
      "Content-Type": "application/json; charset=utf-8",
      Authorization: `Bearer ${token}`,
    },
  })
    .then((response) => {
      response.data.channels.forEach((element) => {
        if (element.name === channelName) {
          id = element.id;
          return element.id;
        } else if (element.name === "general") generalId = element.id;
      });

      return generalId;
    })
    .catch((err) => {
      console.log("axios Error:", err);
    });

  return id;
}We want to make sure that the requests that are coming to our server comes from Slack itself. For that, we will use some hashing to see whether the request is valid.
const crypto = require("crypto");

exports.validateSlackRequest = (event, signingSecret) => {
  const requestBody = JSON.stringify(event["body"]);
  const headers = event.headers;

  const timestamp = headers["x-slack-request-timestamp"];
  const slackSignature = headers["x-slack-signature"];
  const baseString = "v0:" + timestamp + ":" + requestBody;

  const hmac = crypto
    .createHmac("sha256", signingSecret)
    .update(baseString)
    .digest("hex");
  const computedSlackSignature = "v0=" + hmac;
  const isValid = computedSlackSignature === slackSignature;

  return isValid;
};We don't want to hardcode our sensitive data.
tokenandsigningSecretwill be given after slack configuration.
// These can be filled after Slack configuration
export const token = process.env.SLACK_BOT_TOKEN;
export const signingSecret = process.env.SLACK_SIGNING_SECRET;

export const redisURL = process.env.UPSTASH_REDIS_REST_URL;
export const redisToken = process.env.UPSTASH_REDIS_REST_TOKEN;
Handling Slash Commands
Create a file named note.js with the code:
Simply tokenize the coming request from the slash commands. Depending on the command, direct the request to relevant handlers.
import { tokenizeString } from "./_utils";
import { setKey } from "./slash_handlers/_set_key";
import { addToList } from "./slash_handlers/_add_to_list";
import { listAll } from "./slash_handlers/_list_all";
import { getKey } from "./slash_handlers/_get_key";
import { removeFromList } from "./slash_handlers/_remove_from_list";

module.exports = (req, res) => {
  const commandArray = tokenizeString(req.body.text);
  const action = commandArray[0];

  switch (action) {
    case "set":
      setKey(res, commandArray);
      break;
    case "get":
      getKey(res, commandArray);
      break;
    case "list-set":
      addToList(res, commandArray);
      break;
    case "list-all":
      listAll(res, commandArray);
      break;
    case "list-remove":
      removeFromList(res, commandArray);
      break;
    default:
      res.send({
        response_type: "ephemeral",
        text: "Wrong usage of the command!",
      });
  }
};
Create a directory named slash_handlers and inside:
_set_key.js:
Using Upstash RESTFUL API, we can simply send a request without the need to create a client to connect to our database. This is one of the strengths of Upstash Redis.
const axios = require("axios");
import { redisURL, redisToken } from "../_constants";

export async function setKey(res, commandArray) {
  let key = commandArray[1];
  let value = commandArray[2];

  await axios({
    url: `${redisURL}/set/${key}/${value}`,
    headers: {
      Authorization: `Bearer ${redisToken}`,
    },
  })
    .then((response) => {
      console.log("data from axios:", response.data);
      res.send({
        response_type: "in_channel",
        text: `Successfully set ${key}=${value}`,
      });
    })
    .catch((err) => {
      console.log("axios Error:", err);
      res.send({
        response_type: "ephemeral",
        text: `${err.response.data.error}`,
      });
    });
}
Handling Events
Create a file named events.js with the code:
Slack sends a challenge for verification. If this is the case, direct request to that handler. Otherwise, check validity of the request and then direct it to relevant handler functions.
import { challenge } from "./events_handlers/_challenge";
import { app_mention } from "./events_handlers/_app_mention";
import { channel_created } from "./events_handlers/_channel_created";
import { validateSlackRequest } from "./_validate";
import { signingSecret } from "./_constants";

module.exports = async (req, res) => {
  var type = req.body.type;

  if (type === "url_verification") {
    await challenge(req, res);
  } else if (validateSlackRequest(req, signingSecret)) {
    if (type === "event_callback") {
      var event_type = req.body.event.type;

      switch (event_type) {
        case "app_mention":
          await app_mention(req, res);
          break;
        case "channel_created":
          await channel_created(req, res);
          break;
        default:
          break;
      }
    } else {
      console.log("body:", req.body);
    }
  }
};
Create a directory named events_handlers and inside:
_challenge.js:
Simply send back the challenge for Slack verification.
export function challenge(req, res) {
  res.status(200).send({
    challenge: req.body.challenge,
  });
}_app_mention.js:
When our bot is mentioned, this function will be triggered. Simply post a greeting message to any channel with any text you like.
import { postToChannel } from "../_utils";

export async function app_mention(req, res) {
  let event = req.body.event;

  try {
    await postToChannel(
      "general",
      res,
      `Hi there! Thanks for mentioning me, <@${event.user}>!`
    );
  } catch (e) {
    console.log(e);
  }
}-
Create other handler js files similar to
_app_mention.js. (For reference, you can go to Github Repo Of the Project) _channel_created.js
After all is done
Folder structure
Your folder structure should look something like this:
<project_name>:
    api:
        _constants.js
        _utils.js
        _validate.js
        events.js
        note.js

        events_handlers:
            _app_mention.js
            _challenge.js
            _channel_created.js

        slash_handlers:
            _add_to_list.js
            _get_key.js
            _list_all.js
            _remove_from_list.js
            _set_key.js
Running Locally
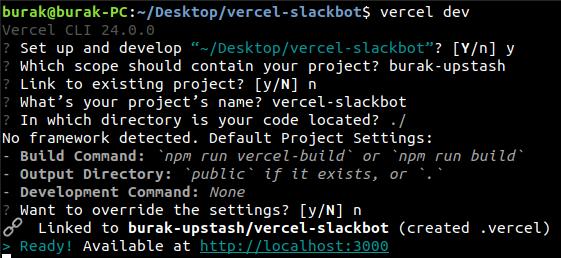
Vercel has a CLI that lets you simulate deployment on your local environment. To do so:

If you don't have a static IP address, then you should use a tunnelling service such as ngrok so that you can show your endpoint to Slack:
./ngrok http 3000--> Tunnels your localhost:3000

Configure Slack
1. Go to Slack API Apps Page:
- Create new App
- From Scratch
- Name your app & pick a workspace
- Go to Oauth & Permissions
- Add the following scopes
- app_mentions:read
- channels:read
- chat:write
- chat:write.public
- commands
- Install App to workspace
- Basic Information --> Install Your App --> Install To Workspace
- Add the following scopes
2. Note the variables:
SLACK_SIGNING_SECRET:- Go to Basic Information
- App Credentials --> Signing Secret
- Go to Basic Information
SLACK_BOT_TOKEN:- Go to OAuth & Permissions
- Bot User OAuth Token
- Go to OAuth & Permissions
3. Go to Slack API Apps Page and choose relevant app:
After deployment, you can use vercel_domain or ngrok_domain as <domain>.
- Go to Slash Commands:
- Create New Command:
- Command :
note - Request URL :
<domain>/api/note - Configure the rest however you like.
- Command :
- Create New Command:
- Go to Event Subscribtions:
- Enable Events:
- Request URL:
<domain>/api/events
- Request URL:
- Subscribe to bot events by adding:
- app_mention
- channel_created
- Enable Events:
- After these changes, Slack may require reinstalling of the app.
Congratulations!
You now have a functioning serverless Slackbot! Feel free to customize it however you like.
After you are satisfied with the results, simply:
vercel deployfor testing on Vercel servers before deployment.vercel --prodfor final deployment on Vercel servers.
You can now use the domains provided from Vercel on your Slack configurations.
